FOLLOW ALONG! Subscribe to my newsletter and follow along on Facebook, Pinterest and Instagram for the latest updates, recipes and content.
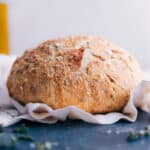
Herb Bread
Get ready to experience the ultimate flavor explosion with this no-knead Herb Bread! Fresh rosemary, thyme, and garlic give this bread a tantalizing aroma and taste that will have your mouth watering. And the best part? It's a cinch to make, with minimal effort and hands-on time. Just mix, let sit overnight, and bake for a flavorful masterpiece that pairs perfectly with a cozy bowl of soup. Don't wait – try this amazing bread now!
Servings 12 slices
Calories 139kcal
Cost $4.54
Equipment
- Cast-Iron Pot (Note 1)
- Parchment paper
Ingredients
- 2 teaspoons minced garlic
- 1-1/2 tablespoons finely chopped fresh rosemary (or 1 tsp dried) (Note 2)
- 1-1/2 tablespoons finely chopped fresh thyme (or 1 tsp dried)
- 1/4 teaspoon black pepper
- 2 teaspoons instant yeast
- 2 teaspoons honey
- 1-1/2 cups warm water (Note 3)
- 3 cups white, all-purpose flour
- 1-3/4 teaspoons fine sea salt
- 1 tablespoon + 1 teaspoon olive oil, separated
- Optional: flaky sea salt, for topping
Instructions
- YEAST: In a large bowl, whisk together 2 tsp. minced garlic, 1½ tbsp. finely chopped rosemary, 1½ tbsp. finely chopped thyme, 2 tsp. yeast, 2 tsp. honey, and 1½ (350g) warm water.Let the mixture sit for 5 minutes. It should look creamy or foamy after this time. If it doesn't, your yeast may be dead or the water may have been too hot. In this case, you will need to start again with fresh yeast and water that is not too hot or cold.
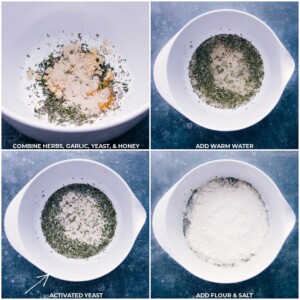
- DOUGH PREP: Once you have confirmed that the yeast is active, add 3 cups (445 grams) flour on top of the yeast mixture in the bowl. Then add 1-3/4 tsp salt on top of the flour.Use a strong silicone spatula to stir the mixture until a shaggy dough forms with no dry streaks of flour. The dough should be sticky and wet. If it is too dry, add a touch more water. If it is too wet, add a touch more flour. Drizzle 1 tsp. olive oil evenly over the dough. Then cover the bowl fully with plastic wrap.
- REST DOUGH: Leave the dough covered at room temperature (around 70°F or 21°C) for a minimum of 10 hours and a maximum of 18 hours.Leave the dough on the counter, free of draft. After the dough has risen for the desired amount of time, it should have more than doubled in size and be covered in small bubbles. It is now ready to be shaped and baked.
- PREP TO BAKE: Preheat the oven to 450°F (230°C). Place the oven rack in the center of the oven. Place a 5.5-quart cast iron pot in the oven and heat it for 30 minutes before baking the bread.
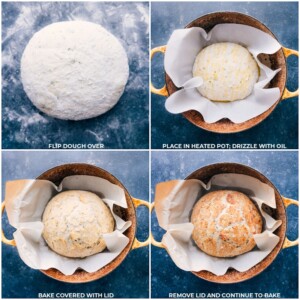
- SHAPE: Sprinkle 1 tablespoon of flour on a clean work surface. Scrape all of the dough out of the bowl onto the flour using a spatula. Sprinkle 1 more tablespoon of flour on top of the dough.Use the spatula or a dough scraper to gently fold the sides of the dough inwards, making a total of 6 folds, to form a rough ball shape. Do not knead the dough; the ball does not need to be perfect.Set out a large piece of parchment paper (See Note 4) next to the dough ball. Use the spatula or dough scraper to gently transfer the ball to the parchment paper, flipping it upside down so that the seam sides are down and touching the paper. Slide the ball to the middle of the paper and press in the sides to gently shape it into a rough ball. (Optional: If you have a lamé, score the top of the dough ball 3-5 times using the tool.)

- BAKE: Working quickly, carefully pull the preheated pot from the oven, remove the lid, and lift the parchment paper with the dough ball up and into the pot. Drizzle the top of the bread with remaining 1 tbsp. olive oil and a light sprinkle of sea salt flakes if using. Cover the pot with the lid and bake for 30 minutes.After 30 minutes, keep the pot in the oven, but remove the lid and continue to bake for an additional 12-20 minutes, or until the bread sounds hollow when tapped in the middle and is a deep golden brown on top.
- COOL: After the bread has finished baking, carefully remove it from the pot, holding the sides of the parchment paper. Slide the bread off the paper and onto a wire cooling rack. Let the bread cool for 30 minutes. During this time, the steam from the bread will continue to cook it (See Note 5).Once the bread has cooled for 30 minutes, transfer it to a cutting board. Use a very sharp serrated knife to cut the bread. It is difficult to cut through the bottom crust without a sharp knife.
- STORAGE: On the first day, leave the bread out, uncovered, with the cut side down on a cutting board. This helps to keep the crust crisp without drying out the inside of the bread. After the first day, store the bread in an airtight container or bag. The bread may lose some of its crispy texture when stored this way, but it will still be delicious when toasted. To enjoy the bread after it has been stored, simply toast it as desired. The bread will taste great even if it has lost some of its original crispiness.
Notes
Note 1: Cast-iron pot: Here is a great affordable cast-iron pot and here is my personal favorite pot! If you don't have one, read the post in this recipe for an alternative.
Note 2: Herbs: Fresh herbs are going to deliver much more flavor and aroma than dried. Truthfully, they are a pain to finely chop, but so worth it! I grab one (.75 oz) packet of rosemary and one (.75 oz.) packet of thyme and use a little over half of each packet per loaf of bread. Pull the herbs from the stems and finely chop then pack in measuring spoons to get an accurate measurement.
Note 3: Water temperature: Drizzle a few drops of the warmed water onto the inside of your wrist. If it is warm and comfy for you, it will be perfect for the yeast. If it is not warm and instead feels hot, it will be too hot for the yeast. Too cold and the yeast will simply remain dormant.
Note 4: Parchment paper: Be sure you're using parchment paper-- not foil or wax paper. Wax paper will melt in the oven! Without parchment paper, the bottom crust is too tough.
Note 5: Cooling: The cooling time is just as important as the bake time! The residual heat and steam ensure the inside is fully baked through. As tempting as it is to cut in, don't rush it because you'll likely end up with a mushy instead of airy inside texture.
Nutrition
Serving: 1serving | Calories: 139kcal | Carbohydrates: 26g | Protein: 4g | Fat: 2g | Saturated Fat: 0.3g | Polyunsaturated Fat: 0.3g | Monounsaturated Fat: 1g | Sodium: 341mg | Potassium: 56mg | Fiber: 1g | Sugar: 1g | Vitamin A: 0.3IU | Vitamin C: 0.2mg | Calcium: 7mg | Iron: 2mg