FOLLOW ALONG! Subscribe to my newsletter and follow along on Facebook, Pinterest and Instagram for the latest updates, recipes and content.

Rocky Road Cookies
Rocky Road Cookies are fudgey, sweet, and downright delicious! These irresistible cookies are packed with pools of melty chocolate, dry-roasted and lightly salted nuts, and gooey bites of marshmallow. A dream cookie for Rocky Road lovers!
Servings 35 cookies
Calories 143kcal
Cost $5.76
Ingredients
- 1 cup unsalted butter, at room temperature (Note 1)
- 1-1/2 cups light brown sugar, tightly packed
- 2 large eggs
- 2 teaspoons vanilla extract
- 1 teaspoon each: cornstarch, baking soda, fine sea salt
- 1/2 cup Dutch-process cocoa powder (Note 2)
- 1 cup cake flour (Note 3)
- 1-1/2 cups all-purpose flour
- 2 cups milk (or semi-sweet) chocolate chips
- 1 cup roasted and lightly salted peanuts (or other nut you enjoy)
- miniature marshmallows not full-sized ones
- Optional: sea salt flakes for topping
Instructions
- CREAM BUTTER AND SUGAR: Add room temperature butter (not softened or melted) and brown sugar into the base of a stand mixer fitted with a whisk attachment. Beat until completely combined and ultra creamy, about 3-4 minutes. The mixture should be the consistency of peanut butter. See the tips in the notes section below this recipe for important considerations.
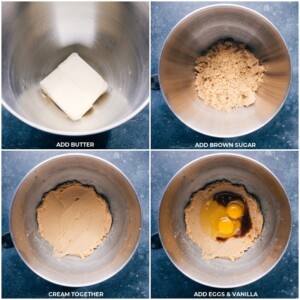
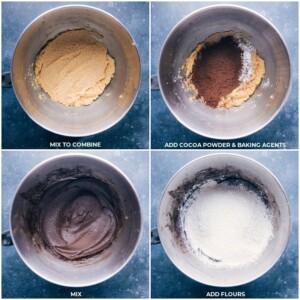
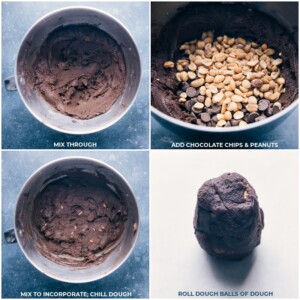
- ADD REMAINING INGREDIENTS: Add in the eggs and vanilla. Beat until combined. Add the cornstarch, baking soda, salt, and cocoa powder. Beat until just combined, scraping down the sides with a spatula as needed. Add the cake flour and regular flour (Note 3) and again, beat until combined. Don't overmix the mixture. Fold the chocolate chips and peanuts into the dough with a spatula. Cover the bowl tightly and refrigerate for 45 minutes up to 2 hours. (If longer than 2 hours, you may need to let the dough sit at room temperature for 30 minutes or so to be able to roll cookie dough balls.)
- FORM COOKIE BALLS: After 45 minutes, remove the bowl from the fridge and form cookie dough balls. Each ball should be just over 2 tablespoons of dough (40g) each. You should get around 35 equal-sized balls from the dough. Roll into large and tall (instead of round and wide) balls and place on a parchment-paper-lined sheet pan or plate and return to the fridge or freezer to chill for 15 more minutes.
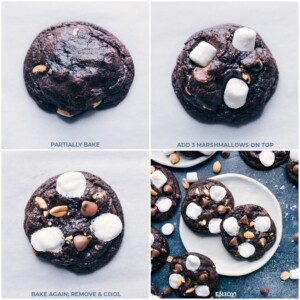
- BAKE AND ADD MARSHMALLOWS: Meanwhile, preheat the oven to 325 degrees F (162 degrees C). Line an extra-large sheet pan with a silicone liner (parchment paper works, but cookies bake even better on a liner). Add 6 cookie dough balls to the sheet pan, leaving plenty of space in between each cookie. Bake for 10 minutes. Remove cookies and press 3 marshmallows into the tops of each cookie. Return to the oven and bake for 2-4 more minutes or until no longer gooey on top and set at edges. Slightly underbaked is best -- they will firm up to a nice and fudgy/chewy cookie as they set (Note 6.)Optional: Right out of the oven, press a few extra chocolate chips and/or peanuts into the tops of the cookies. Let cookies stand on the cookie sheet pan for 5 minutes before removing them to a cooling rack. Allow cookies to cool and finish firming up here. Repeat this process with the remaining cookie dough or freeze the remaining cookie dough (Instruction #6)
- STORAGE: We like these cookies best the day they're baked. They do last up to a week, but they begin to lose texture and flavor after 3-4 days. To store: Place in an airtight container and keep at room temperature. Wait until cookies are completely cooled before adding to the container. Rewarm in increments of 10-15 seconds in the microwave.
- FREEZING: Instead of freezing the baked cookies, freeze the dough instead! Drop the cookie dough balls on a large sheet pan and freeze until solid. Once solid, transfer the frozen cookie dough balls to an airtight container or bag and freeze for up to three months. You can bake these cookies straight from the freezer. There is no need to thaw, but you may need to add a few extra minutes to the baking time. Bake until the edges are lightly browned, and the center is still soft.
Video
Notes
TIP: We highly recommend using the exact ingredients called for in this recipe to achieve the best results in creating these cookies. So wait for a grocery store run if you don't have the right cocoa powder or flour; the wait will be worth it so you don't end up with lackluster cookies -- or worse, cookies that don't bake up properly.
Note 1: Room temperature butter: If you touch the butter and are left with greasy fingers and a deep indent, the butter is too soft. Pop it in the fridge for a bit before using. If butter is cool to the touch and makes a slight indent when pressed with a finger, it is the perfect temperature! Softened or melted butter won't cream properly.
Note 2: Cocoa powder: I don't recommend using plain cocoa powder (you'll end up with dry, less flavorful cookies). Hershey’s® “Special Dark” cocoa powder is a Dutch-process cocoa powder that is readily found at most grocery stores.
Note 3: Cake flour: Cake flour is usually found in the baking supplies aisle in the grocery store near other types of flour. I don't recommend a different flour substitute or making homemade cake flour -- it doesn't work the same in this recipe.
Note 4: Measure flour correctly: If you press a measuring cup into a bag of flour and scoop, you will pack in way too much flour which affects the texture of these cookies. To properly measure your flour, spoon the flour into the measuring cup until it’s overfilled. Then use the back of a table knife to level the measuring cup at the top. (Video visual here)
Note 5: Chill the dough. Don’t rush the chilling time or you’ll find yourself with cookies that spread too much.
Note 6: Ever so slightly underbake. If you overbake these cookies, the taste and texture will be off. Slightly underbaking these cookies keeps them soft, chewy, and flavorful. Remember, the residual heat on the pan continues to bake the cookies for a couple of minutes even after they’re pulled out of the oven. Visual cues to look for: firm edges and set center (they shouldn't be overly gooey/wet looking).
Nutrition
Serving: 1serving | Calories: 143kcal | Carbohydrates: 18.7g | Protein: 2.4g | Fat: 6.9g | Cholesterol: 24.9mg | Sodium: 53.9mg | Fiber: 0.7g | Sugar: 10.1g